
Much the same as with a car, regular maintenance of your kayak is essential; this includes tightening any loose bolts, checking the integrity of the outfitting, regular rinsing of the kayak after use, and transporting and storing it correctly.
Salt water greatly accelerates the corrosion of metals; we use stainless steel wherever possible, however it should be noted that this is only corrosion resistant, not corrosion proof (a common misconception). Crystallisation of salt within material components and in other areas can also cause accelerated wear.
Sand, grit, and small stones can build up in the skeg blade and slider boxes, causing jams, as well as accelerated wear in these areas and where such material has crept underneath outfitting or been abraded between your heels and the inside of the kayak whilst paddling. Internal scratches can also drastically increase the chances of a split developing in the shell after regular flexing, or a significant impact in that area.
Due to the above factors, we strongly recommend rinsing your shoes before entering the kayak where possible, and regularly rinsing the kayak both inside and out with fresh water after use, paying particular attention to the skeg blade and slider areas. We’d also recommend occasionally removing the skeg system for a more thorough rinse and to flush the skeg line tubes.
As well as regularly rinsing the skeg blade and slider areas, there are a few more steps you can take to maintain your skeg system and help ensure its reliability whilst you’re out on the water:
For more tips on skeg care, watch this video: Caring for your P&H Hydrofoil Skeg System
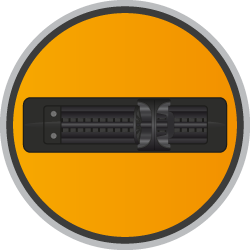
The skeg slider is intentionally set at the factory to only travel along 2/3rds of the slider box; this is to allow for settling of the system during the first few months of use.
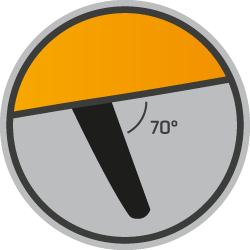
To avoid an impossible leverage angle between the skeg line attachment point and blade pivot, the skeg blade should only deploy to maximum angle of 70° to the hull; adjust the skeg line length as necessary if the skeg blade of your P&H Sea Kayak extends beyond this angle.
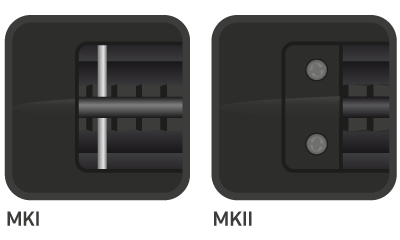
Our current, MKII Skeg Slider System was introduced in 2012; there are known issues with previous systems, and therefore when troubleshooting any problems with these we'd usually recommend a full upgrade to the current system.
Replacement skeg system parts such as Composite Skeg Slider Bars, Skeg Slider Buttons, Skeg Blades, Low-Friction Skeg Line, and Skeg Deployment Bungees, as well as full MKII Skeg Slider Upgrade Kits are available through your local dealer.
When loading hatches, take care not to dislodge or damage the skeg/rudder tubes, scratch the inside of the kayak, or damage the bulkheads. Unevenly or excessively loaded hatches can also lead to poor or unsafe performance and potentially deformation of the kayak.
If you have trouble fitting your kayak’s hatch covers, we recommend applying silicone spray to the hatch rim and inside edge of the hatch cover.
We advise regularly inspecting your kayak for damage, particularly after any bumps or scrapes, as the force of subsequent impacts across the rest of the kayak can concentrate around existing cracks and lead to their worsening.
It's worth noting that any significant force or impact in the areas near the bulkheads can transfer through to the other side of the kayak, i.e. a large impact on the hull just under a bulkhead may result in a crack in the deck.
When inspecting the kayak, also look for areas where the gel coat has become thin or worn away through abrasion during use; this may be seen most commonly inside the kayak under the paddler’s heels, and along the keel line.
For advice on how to repair any of the above, where to source materials, or professional repair services in your area, please contact your local P&H Sea Kayaks dealer.
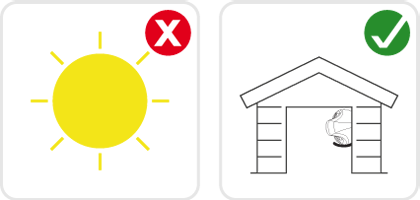
We strongly recommend storing any polyethylene kayak out of direct sunlight and at a safe distance from any heat sources; this will help minimise the effects of UV degradation and avoid any distortion due to overheating.
You should check your kayak over periodically, especially after any impacts or contact with sharp or rough surfaces, looking for dents and deformations, or any deep scratches and splits, particularly those where whitening can be seen either inside or outside the kayak around the area. Also look for wear or punctures that expose the foam core on triple layer models.
The minicell foam bulkheads in polyethylene P&H Sea Kayaks are bonded in using a high-strength, flexible polyurethane sealant, and feature a pressure relief hole and a specifically engineered slot to allow them to flex with the boat as necessary; even so, it is worthwhile inspecting the seal of the bulkheads periodically, as this may be broken through significant flexing of the hull, or accidental damage caused by the hatch load.
Plastic Welding Rods supplied with instructions are available on our webstore and are suitable for repairing small punctures or splits; please contact your local P&H Sea Kayaks dealer for advice on other polyethylene repairs.
Loose or weakened outfitting can lead to poor control over the kayak, which in itself can increase the likelihood of damage.
When checking the tightness of any bolts (particularly after long drives where road vibrations can cause them to loosen), be careful they are not overtightened, as this can break the seal of any rubber O-rings or gaskets and cause leaks, as well as applying excessive force to the shell and outfitting components which may lead to damage.
The moulded, plastic washers around the bolt heads of some fittings are designed to deform when overtightened; if this occurs, simply back the bolt off slightly. For any fittings which you do not plan to adjust regularly, we recommend the application of Threadlock to reduce the need for regular tightening of bolts.
If you notice any other issues with your outfitting, refrain from using the kayak and contact your local dealer for advice and to order any necessary replacement parts; any damage caused by the use of a kayak with excessively worn or broken outfitting is not covered under warranty.
Where possible, storing your boat off the ground, upside down on a padded rack and out of direct sunlight is strongly recommended, as this will protect it from both frost and UV rays; we use unique additives to significantly reduce the damage caused to the kayak by UV light, but in areas of strong UV concentration and after prolonged exposure, the structure of the boat may still be affected.
The kayak should also be stored with the skeg deployed to relax the skeg deployment elastic/spring and prolong their effective lifespan.
We'd also recommend removing the hatch covers during storage to allow the hatches to dry out completely.

When transporting your kayak on a roof rack, NEVER strap it with the hull flat against the horizontal bars; they are not designed to withstand such forces, and this can lead to flexing the area of the boat which is most likely to be affected by scratches; instead, strap it either on its side with the hull against a set of padded uprights, or upside down with the bars evenly spaced fore and aft of the cockpit – in either case, the boat should be strapped down so that it is secure, but not excessively tight.
To further secure the kayak, particularly during longer drives, motorway sections, and windy conditions, we highly encourage the use of bow and stern lines; the same as straps, these should be secure, but not excessively tight as this may distort the kayak.
For transporting composite kayaks on a roof rack, we’d strongly recommend a good set of padded J-bars, as these greatly reduce the likelihood of overtightening, and help ensure the kayak is secure during transport.
In general, hatch covers are best left fitted to the kayak during transport to avoid them being lost.
Always handle the kayak between two people wherever possible, particularly when lifting it on and off a trailer or roofrack; be sure both people are clear on the intended plan before commencing any movements. Various types of roof rack loading assistance devices are available, but if possible, ask a second person to be ready to catch the boat if it slips, or alternatively use straps to prevent this.
When lifting or carrying the kayak, hold it under the bow/stern; the toggle handles are designed for holding onto the kayak in the event of a swim only, and particularly if damaged or worn, may break if used to carry a fully-loaded kayak, causing the kayak to be dropped and potentially damaged.
If using a trolley, take care with its placement; flat trollies should usually be placed under a bulkhead, and V-trolleys in a snugly fitting location towards one end. Make sure the trolley is correctly assembled and securely fitted before moving the kayak, and refrain from pulling it at speed over bumpy ground, or at an angle which may cause one end of the kayak to drag along the floor.
During beach landings, take care to only pull the kayak up the shore so much as it is just out of water before transporting it the remaining distance using the above methods. In no other circumstances should you drag the kayak.
Please note that a warranty will only cover breakage as a result of a defect in materials or workmanship; paddlesports can be both unpredictable and unforgiving, particularly where kit is concerned, and as such we strongly recommend ensuring you have an appropriate insurance policy in place to cover accidental loss or damage to your boat, as well as the rest of your kit.
For UK residents, we recommend taking a look at the boat Insurance policies available with British Canoeing Membership.